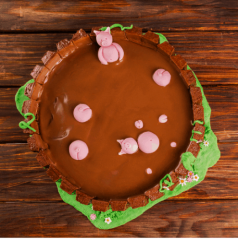
Jennifer´s Cakes was recently asked if we could recreate this incredible idea which has gone viral, with hundreds of photos being uploaded daily of peoples interpretations of this cake. The techniques are the same throughout, you just have to swap the colours and animals. We were asked the do the original style for a birthday cake which was for a pig fanatic. I have to say, if it was my birthday I would want this cake, even though i am not a pig fanatic. It is just so cute. Here is how you do it…
Feeds 12 people you will require an 8 inch deep cake tin and an 8 inch cake board to place your cake on before you begin to decorate.
Decorating Ingredients;
10 packets of 5 fingered kitkats (what ever is left over you can enjoy)
whipped cream (I find it easier to use directly from a cannester but you can whip it yourself)
2x 200g milk chocolate bars
250g pale pink marzipan or you can buy fondant which can be coloured already or you can colour it yourself using a pink gel food colouring for the cute characters.
100g green, white and yellow fondant for the various flowers and vine decorations which are placed around the kitkat mud bath.
With regards to tools, you will require a tooth pick for the small details on the pigs and a black edible pen for the eyes and mouth.
Before making the cake, it is always best to get the small elements out of the way for example; The pigs, flowers and small features on the cake should all be done prior to the baking of the cake as this will give them enough time to dry. If you are super organised then you can do them anywhere from a week in advance, just so that you do not have too much to do on baking day. Using the picture attached, you can really easily form the shapes required for this cake however, if you have any issues, please do not hesitate to let me know. With regards to making flowers, you will find various tips dotted around the website, which will help you immensely when making these flowers. Once all the small faces, bums, tails and flowers have been created, then it is time to make the base of our structure… THE CAKE.
Cake Ingredients;
140g plain flour
200g unsalted butter
200g caster sugar
4 eggs
60g pure cocoa powder
2 tsp baking powder
pinch of salt
oil/quick release spray for your baking tin
Method for the cake;
This is extremely easy, set the oven to 200 degrees Celsius and spray your baking tin with easy release spray and set to one side. Then, place the butter into a big clean bowl and mix until the butter turns from a yellow colour to a pale cream colour. Then, add the sugar and mix until the mixture becomes light and fluffy. Add the eggs one by one ensuring each egg has been fully mixed in before adding the next one. You may find that the mixture then begins to separate however, do not worry as this will bind fully with the addition of your dry mix. In an additional bowl, add the flour, baking powder, salt and cocoa and stir well. Add the dry cocoa mix into the wet egg mix 1/3 at a time ensuring the mixture has been well incorporated. Once all the ingredients have been added and it is all in one bowl, you are ready to add the mixture into the baking tin and set in the oven for around 45 minutes, until you can place a skewer into the centre of the cake and remove it without any gunk (not really a scientific word i know). Once the cake is ready, remove it from the oven and set aside in the cake tin for around 10 mins. Then, once cool remove from the tin and place on a cooling rack until fully cold.
Ingredients for Butter cream;
500g icing sugar
250g unsalted butter
100g dark good quality chocolate (at lease 70% cocoa solid) (melted but cooled).
Method for Butter cream;
Place the butter into a big clean bowl and whisk until the colour of the butter turns a pale cream colour. This should take around 5 minutes of constant whisking. Then 1/4 at a time, put the icing sugar in with the butter, however DO NOT WHISK. If you would like a kitchen covered in white icing, then whisk away but if not, this is where you use some elbow grease and get stiring with a wooden spoon. once you have mixed in all the icing sugar and there are no flyaway bits, then you can continue whisking until the mixture in smooth. Then, place your melted chocolate into the mix whisking well. Here you have your chocolate butter cream.
Divide the cake into two perfect halves and spread a thick layer of butter cream on the inside of the two halves and stick them together to form a sandwich, place on top of the cake board and spread a thick layer of butter cream around the entire outside of the cake. Place your butter creamed cake in the fridge for 2 hours. Leave the excess butter cream out in a cool place so you can repeat the last step, after the cake comes out of the fridge.
Once you have finished the second layer of butter cream, now is the time to begin the next step, placing it all together.
If you need any help or just want us to make you one of these cakes, then get in touch!!
Caio for now.
