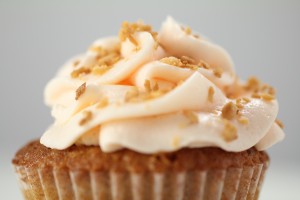
Unfortunately nowadays there are so many people who cannot have wheat or Gluten for one reason or another, whether it is because they are on a diet or because their bodies just cannot handle those particular ingredients. Gluten is an ingredient which the majority of people should not eat but they do anyway just because it is used to c reate some of the most delicious food. In this day and age there are so many alternatives to certain products and instead of using flour which is made with wheat and gluten, the supermarkets and various production companies have made a wheat free, Gluten free ‘flour’ which can be used and also create the perfect cakes and cupcakes. This is how you make vanilla wheat free and gluten free cupcakes…
What you need for the cakes;
250g Wheat-free, gluten – free flour
220g Caster Sugar (brown sugar also works really well with these cakes and gives them a golden finish)
2tsp Baking soda
210g Stork margarine (room temp)
4 Organic, free range eggs
4tbsp Corn flour
8-9tbsp Milk, as required
2tsp Vanilla extract
What you need for the icing;
500g Icing Sugar
250g Unsalted butter
2tsp Vanilla extract
2-3 tbsp Milk at room temp
Method:
Pre heat the oven to 160 Degrees Celsius and line a baking tray with paper cupcake liners. Place the Stork into a bowl and mix for 2-5 minutes until the colour of the stork goes from a yellow to a pale white colour, this stage is extremely important so make sure you do this properly. Then mix the sugar into the butter and mix again until light and fluffy. Add in one egg at a time and ensure that the mixture is well combined before the next addition of egg. Once you have added all of your eggs into the butter and sugar combination then add the vanilla extract to the milk and leave to one side. Sieve the flour into a separate bowl and add the corn flour and the baking powder to this bowl. You should now have two bowls, one filled with wet ingredients and one filled with dry ingredients; you must also have a small cup which contains the milk and vanilla extract. Slowly, add the dry mixture to the liquid mixture 1/3 at a time but do not use an electric mixture as this can cause you mixture to lose valuable air pockets so take a large wooden spoon and use that to mix. Make sure you do not mix too much, just enough to ensure the mixture is well incorporated. Once you have finished adding in your flour, slowly add in your milk and vanilla and mix. Your ingredients are now ready to spoon into your cupcake holders. Carefully spoon it in and make sure that your cupcake holders are only 1/2 full as this will then provide ample space for your cupcakes to rise, whilst baking. Place into the oven and leave to cook for 18-25 minutes. Do not open the oven until you reach the 18 minute mark as this could cause the centre of your cakes to sink, making them hard to ice and look presentable. Once they are ready you should be able to insert a skewer directly into the centre of your cakes and pull it out clean. Once you can do this, you can remove your cakes from the oven and leave them to stand in the baking tray for 10 minutes, and then you can remove them and leave them to cool on a wire rack.
Now you can get cracking on the icing, whilst the cakes are cooling. Mix the butter, same as you did for the stork, ensuring that it reaches the whipped, white, glossy stage, this will take between 2-5 minutes of whisking. Once your butter is ready, add the icing sugar SLOWLY on a very low mixing speed as if you have your mixer on too high, then this can cause the icing to shoot off in every direction, cause a film of icing over not only yourself but also your entire kitchen. Mix in the icing sugar a 1/3 at a time. Once the icing has been mixed in, your icing will appear seriously thick, so this is where your milk comes in. Add the vanilla extract to the milk like we did before in the cake method and slowly add the milk mix to the icing. This is not only added to loosen the icing, but also to ensure that the icing remains thick and glossy. Your icing is done! All you need to do now is decorate your cakes. I like to ice my cakes using a piping bag. I also like to use colours depending on the flavours of the cupcakes. As these cakes are vanilla, I will leave this icing cream coloured. I also like to break one of the cupcakes up into thin crumbs and use the crumbs to sprinkle on top of the icing to give the cakes a nice finish.
So this is how you make wheat/gluten free cupcakes that are just as delicious as wheat cupcakes… ENJOY!
Leave a Reply